Translate

Friday, August 8, 2014

Traveling Light: Putting Together a Photography Kit for Travel


Traveling Light: Putting Together a Photography Kit for Travel

Taking photographs on holiday or whilst traveling for any other reason is one of the things many of us look forward to. The problem is travel, and in particular air travel, has become hard work – baggage weight and size limits, limits on liquids all add up to a potentially stressful journey. When you get to your destination, it may be hot and full of tourists, not the sort of place for carrying a heavy load of kit. Today we are going to look at some options for traveling light.

The Camera

Obviously this is the most important part in the kit, and you might consider that taking our pro level DSLR is the only option. In reality, image quality between high end DSLRs and more consumer level cameras is negligible these days. If you have a secondary lower level DSLR body, consider taking that and a compact for back up. You will gain significant space and weight savings and your camera will be less of a target for thieves. If you travel a lot, it is well worth considering a mirrorless system. Cameras such those from Fuji and Olympus have extensive lens systems, and fantastically light and small and produce image quality on a par with or even exceeding equivalent DSLRs

D5200 is compact enough to carry everyday and everywhere
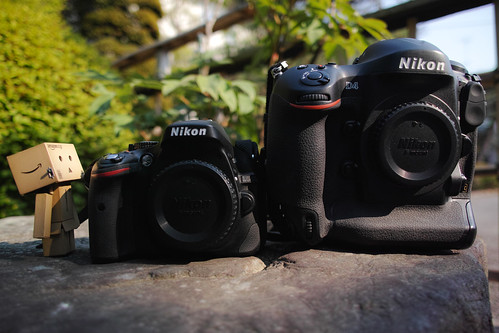
Consider a smaller camera, even a mirrorless system. Photo by Takashi Hososhima

Lenses

Whilst it might be tempting to take the big gun f2.8 zooms, in reality they are a significant drag in terms of both weight and size. A 24-70 and 70-210 f2,8s will add 2-3 kgs of weight to your bag. Some other options are to take a carefully selected set of fast primes or perhaps a single super zoom. Modern super zooms in the 18-200 range have vastly improved optics over their predecessors and will cover virtual all the focal lengths in one lens. Returning to mirrorless systems, again the lenses are significantly smaller yet with superb quality, another option to consider.

IMG_2460: Canon Zoom Lens
A superzoom may replace several lenses. Photo by EagleCam

The Bag

We spend so much time considering our camera and lenses yet so little on the the bag to carry them. A good travel bag's first priority is simple. It must fit inside the baggage dimensions of most major airlines. Putting your beloved equipment in checked luggage is not an option that should ever be considered. Beyond that, the bag needs to be comfortable, remember you may wear this many hours per day, the load should be spread evenly, it should be sturdy enough to withstand the knocks and bumps of day to day travel and it should be waterproof. Backpack or over the shoulder is an entirely personal preference but either way the bag should be easily accessible.

The Tripod

A tripod is an interesting dilemma for any traveling photographer. With high ISO quality so good now you may consider not taking one. However, if you are looking to do any shots that will involve conveying motion, car headlight trails, ethereal misty waterfalls etc, you are going to need a tripod. The best option here is a set of lightweight carbon fibre legs and a ball and socket head. Although not cheap, carbon fibre legs are often half the weight of regular aluminium or steel tripods. A ball and socket head is generally smaller and lighter than a pan and tilt and quicker to use. The downside is they are not quite as easy to position accurately. As an alternative you can also consider a lightweight monopod, with good technique these can be invaluable bits of kit.

WF Fancier 535 carbon fiber tripod
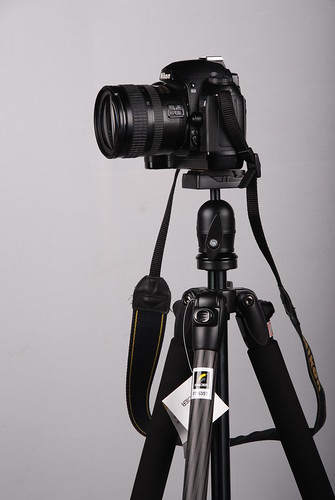
Carbon fibre tripods save significant weight. Photo by F 5.6

Flash

Flashguns are another dilemma when traveling. If you are the sort of person that likes to take outdoor portraits of locals then a flash might be well worth taking. Its worth looking for a smaller less powerful model to save space and weight. Don't forget also that batteries and chargers are all going to add weight too.

Filters

The obvious option for filters is to use a square filter system such as Cokin or Lee. The advantages are that you only need one of each filter plus a filter ring adapter for each lens as opposed to potentially a set of circular filters for each lens. If you already have a set of circular filters, the other options here are step down rings. These allow you to adapt a larger filter to fit on a smaller lens.

At Work
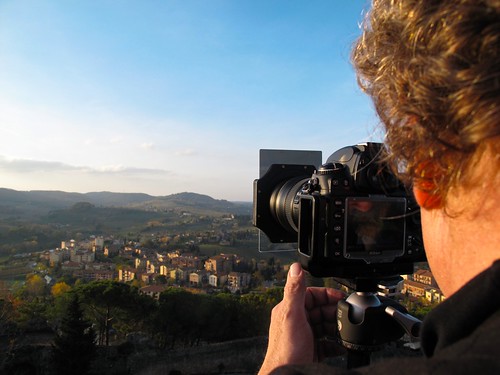
A Square filter system minimizes the need for duplicates. Photo by Mark Mitchell

Traveling as a photographer should be fun and stress free. For it to be that way, we need to make informed decisions on what kit we take with us. Think about the types of shots you generally take and build your kit around that. For the ultimate in creative freedom, consider taking one camera and one prime. You will find the restrictiveness of a single lens will actually make you much more creative in your approach.

Traveling Light: Putting Together a Photography Kit for Travel

Taking photographs on holiday or whilst traveling for any other reason is one of the things many of us look forward to. The problem is travel, and in particular air travel, has become hard work. When you get to your destination, it may be hot and full of tourists, not the sort of place for carrying a heavy load of kit. Today we are going to look at some options for traveling light.


Thursday, July 31, 2014

How to recover deleted photos from a memory card - CNET


How to recover deleted photos from a memory card

Just deleted an important batch of images from your memory card? Never fear, here's how to undelete them for Mac and PC users.

"Uh oh."

Those are probably the first two words you'll utter when you realise your photos have disappeared. If you've accidentally formatted your card or you suspect it has become corrupted, there are ways to recover your images. Here's how to get started.

You will need a card reader, a computer, the memory card in question and nerves of steel.

Step 1: Don't do anything to your memory card once you realise photos have been deleted. This means, don't take any more photos on the card and remove it from the camera immediately.

Step 2: Select a recovery suite. The software mentioned in this tutorial is Recuva for Windows and PhotoRec for Mac, which are both free options.

Bear in mind that there are plenty of other options out there, and you may already have one that was included with your memory card, if it was from vendors such as Lexar or SanDisk.

memorycard.jpg
Dave Cheng/CNET

Step 3: Install and set up the software on your PC or Mac.

Step 4: Let's start with Recuva first. Start up the program and choose what sorts of files you want to try and retrieve. In this tutorial we're looking for photos, but Recuva also gives you the option of finding a number of other file types.

recuva-photorec.jpg
Recuva can also find many other file types. Screenshot by Lexy Savvides/CNET

Click through the menu until you reach the screen telling you in which location to look. Plug your card reader into your computer and select the root directory of where your camera stores its image files -- provided it hasn't disappeared when the card was formatted or the pictures were deleted. This is typically a folder called DCIM, or the name of the camera manufacturer or model.

For PhotoRec, the process looks a little more complicated, as it's a command-line interface rather than a graphical one. Don't be scared off though, as it's quite easy to use once you get accustomed to it.

Start up PhotoRec and enter your Mac password if prompted, so the program can have access to all drives. Then, select the drive that you want to recover (i.e. your memory card) using the arrow keys to highlight the correct option. It may not be named how you expect, so use the size to give you an indication of which drive is the right one.

Press enter to proceed, and choose the FAT16/32 partition in order to scan the directory structure set up by your camera. Press enter to keep going to the next menu, and select the Other option (FAT/NTFS).

Continue to the next screen using the enter key. This next selection will tell the program where to look for the files. If you suspect the memory card is corrupted, use the "Whole" selection. Otherwise for deleted files, select "Free". Hit enter again and select where to save the recovered files -- use the C key to confirm. Then, start the recovery process.

photorec-run.jpg
Running the scan in PhotoRec Screenshot by Lexy Savvides/CNET

Step 5: Run the scan and see what files it turns up. Hopefully you will get some results here, which means the software has found your images.

recuva-recovered.jpg
The "health" of your files indicated by green, orange or red lights. Screenshot by Lexy Savvides/CNET

If you chose to search only for pictures in step 4, it will only show up standard file formats like JPEG. If you're looking for raw files and they're not showing up, there is one more step you can do.

In Recuva, click "Switch to advanced mode", which will show you what file types the software is looking for. All you have to do is add the file extension of your camera's raw format. This is typically something like .CR2, .NEF or .ARW depending on your camera brand. If in doubt, check your camera manual.

recuva-filetypes.jpg
Add your raw file extension to the box circled above. Screenshot by Lexy Savvides/CNET

In PhotoRec, you can choose the types of files to search for using the "FileOpts" command from the main menu. Some proprietary raw formats will be found under the general .tiff extension, so make sure this is selected.

Step 6: For Recuva, select all the images you want to restore, and click the "Recover" button. Choose a place you want to restore the files to. You will want to choose somewhere you can access easily, like the desktop or your pictures folder. It's best not to save them back to the memory card.

For PhotoRec, you will have already chosen a recovery location in a previous step. Navigate to the folder in Finder to see what's there.

photorec-found.jpg
Ta da! Photos found. Screenshot by Lexy Savvides/CNET

Step 7: Check the files that have been recovered, then back them up!

Hopefully these steps will have recovered your images. If not, there are other options to try, including paid software, as well as professional data recovery services.


Tuesday, July 22, 2014

Camera Modes Explained – PictureCorrect


CAMERA MODES EXPLAINED

If you're just learning about your camera, then chances are you've taken a look at the top of your camera only to become immediately confused. However, you don't need to worry, as I'm going to explain what each and every one of these camera modes does.

camera modes

"Mode Dial & Lock Lever" captured by Hideya Hamano

Automatic ([ ])

The automatic mode really doesn't need much of an introduction; you can probably guess by the name what it does. Automatic allows your camera to set all of your camera options "automatically" to produce the exposure that it thinks is correct.

Automatic mode doesn't allow you to set the shutter speed, aperture, ISO, or even the flash, which often pops up and ruins your photos. If you don't know how to use your camera and are considering shooting in this mode, I would advise against it;  it won't help you one bit, and your images will more than likely come out terribly.

Program Mode (P)

Program mode is a mode for beginners to start to understand their cameras. Program mode is similar to automatic in the way that it allows the camera to make the decision on which settings to use to correct the exposure. Once the settings are selected, you can easily change them. For example, if the camera thinks that the correct shutter speed would be 1/200 of a second but you think this is too slow, you can change it so it gives you a shutter speed of, say, 1/400.

If you don't know much about cameras, I would recommend using this mode to start off with.

Aperture Priority (Av)

Aperture priority is a mode in which you set the aperture while the shutter speed is automatically set for you to give the correct exposure. This mode is useful when you want to achieve a certain depth of field. For example, if you wanted a shallow depth of field (not much in focus) then you could set the aperture to your lens's lowest number (e.g. f/1.8), and if you wanted a wide depth of field you could set it to its highest aperture value (e.g. f/22).

aperture priority mode

"Scream!" captured by Danny Perez Photography

Shutter Priority (Tv)

Shutter priority is similar to aperture priority. This time, however, you only set the shutter speed, and the rest is done for you. This mode is useful when you want to tell the camera that you only want to shoot photos at a certain speed and not any lower or higher.

shutter priority mode

"Untitled" captured by Rick Burress

Manual (M)

Once you have learned how to use your camera, you will probably want to shoot in manual mode as much as possible. While in manual mode, you are able to change all of the settings as you see fit. Aperture, ISO, shutter speed, and white balance settings can all be changed independently to create the image you're looking for.

Learning to shoot in manual mode will help you understand photography in greater detail and will allow you to produce good, consistent shots each and every time.

Give each of these modes a try and see how they work for you.

About the Author:
Ricky Davies is a freelance photographer.


Wednesday, April 9, 2014

How To Shoot A Liquid Flow - DIY Photography


HOW TO SHOOT A LIQUID FLOW

Just for the 4th of July, we thought to show you how to make a different kind of fireworks, the liquid kind.

If you liked Corrie White's how to shoot water drops tutorial, you are going to love her how to shoot a liquid flow tutorial (it's this tutorial :).

Primary Plumes

And here is how it goes

Preparation and Materials

I use a small plastic 5 liter aquarium filled to 3 cm. from the top with water. Only an area of about 8 cm. wide is used to take the pictures. After filling the tank with cold tap water, I wipe the front of the tank with a bundle of pipe cleaners to clean any bubbles sticking to the inside of the tank in the drop zone. Then I let the water settle for a couple of minutes to allow the tiny bubbles to dissipate. On the inside of the back of the tank I have some black plastic for the background which also stops any flash glare on the tank itself.

Above and Below

I usually use table cream mixed with some food dye. Sometimes I will use a bit of acrylic paint but I prefer the cream. I have a thin wire across the top of the tank to mark the area of focus in the drop zone. I dip a marker or ruler into the water to use as a focusing aid. The tank sits on a small cardboard platform with some raised markers so I can reposition the tank in the same spot after each cleaning without having to refocus each time. I prefer to have the camera at a very low angle to the tank so that I can include the surface of the water in the shot. I use medicine droppers and have the cream mixture in shot glasses. I use three flash guns for these. One from the top and two on the front corners. They are triggered by wireless on my Canon 7D camera.

White Plume

The Process

When I'm ready, I drop a small drop of cream into the water and take a couple of shots of the single drop. Then I will use various colors and sometimes drop two colors simultaneously for which I have to tape my shutter button to the floor and trigger it with my foot. Lately, I have been using three droppers with primary colors to get a nice color blend effect. For the plumes, you need to give the dropper a good squeeze. You only get a few shots before the water is too cloudy for any good keepers and the process starts all over.

Set-up for Cream Drops with a base.

For the ones with the splash on the surface with the flow under the water, I fill the tank only half full. The first drop is discarded, but the second one will show the flow underneath. Quite often I will drop a couple of drops of cream into the water, then trigger the splash to fall on top of these. For these shots I will use a delayed flash to light up the action in the water. Also, for these I will use colored gels on the flash guns. Two or three shots and it's clean up time again.

Mint With a Scoop of Strawberry

Post

I like a clean background so I do a lot of clean-up. The water is often cloudy so I clean this up as well as any bubbles that get left in the tank. On all my shots, I rotate the picture 180 degrees so it looks like the flow is moving upwards. Just my preference. Some of the liquid flow shots are suitable for the mirror and flip process. There is a simple tutorial for this here.

The Sacrifice

These are a lot of work but I love the outcome. Definitely not for the impatient!!

About The Author

Corrie White is a photographer based in Ontario, Canada. She shoots breath taking water drops and other water inspired photographs. You can watch her art on her Flickr stream, on her site, or follow her on Facebook.


Tuesday, April 1, 2014

A First Look at Darktable, an Open Source Alternative to Lightroom


A First Look at Darktable, an Open Source Alternative to Lightroom

When it comes to image management programs, the undisputed kings are of course Lightroom and Aperture. Both of these programs have been around for some years and are slick, efficient and fast. They do however cost money, significantly less these days than in their original versions but none the less in these days of global austerity not every photographer will be able to justify the purchase of them. There is however an extremely powerful open source image management program available to Linux and Mac OSX users, Darktable. Open source is free software that is open to further development by outside programmers and as such Darktable has evolved into a very good, free image management program. Darktable can be downloaded from here: http://www.darktable.org


Darktable's well designed interface by Jason Row Photography, on Flickr

Initial Impressions

When I first opened Darktable, I was surprised at how clean and well designed it was. The interface whilst not as slick as it's payware cousins, is none the less easy to understand and well laid out. Inspiration is obviously taken from Lightroom's interface with the use of modules at the top right. These are: Lighttable, this is the catalogue viewing section of the program; Darkroom, like the Develop module in Lightroom, is the image processing area; Tethering, which is self explanatory, and Map, like Aperture's map function, allows you to manually geotag your image.


The modules tab by Jason Row Photography, on Flickr

Modules in Darktable

Lighttable: Lighttable is where the program initialises. To the left of the screen you will see the import dialogue, this allows you to import a single image, a folder of images or to scan for an imaging device. When you import, Darktable just references images in their current location or if you import from a device you will be asked to define a destination folder. Once imported your folder will appear in the next section down, the collect images section. This is your catalogue hierarchy and allows you to create and organise collections around multiple criteria. At the bottom left of the Lighttable module there is metadata information about the image selected in the main catalogue.


The import window by Jason Row Photography, on Flickr

To the right of the Lighttable module we have the ability to add metadata such as description, creator and rights as well as tagging the image. Tagging is the Lighttable equivalent of keywording. At the very bottom is the export dialogue which is a little clunky to use and does not appear to allow exporting of the original image such as a RAW file.

Darkroom: Double clicking on any image in the Lighttable module will automatically open it in the Darkroom module. This is actually surprisingly powerful with many of the tools found on its payware equivalents. The left side of the screen displays basic image information but the heart of the Darkroom module is to the right. At the top right is a largish histogram which you can click on and drag to adjust the white and black levels. Below this a series of small icons reveal different levels of adjustment tools. The choice is surprisingly  comprehensive and includes tone curves, shadow and highlight adjustment, a white balance control with individual RGB channels, sharpening and even a basic automatic lens correction tool. As well as these there are spotting tools, vignetting and graduated filters. As you would expect all of this tools make their adjustments non destructively, the integrity of the original image is maintained and the adjustments only applied in the program itself or when exporting as a new image. Overall the adjustments seem to be applied very quickly and without any discernible lag.


The darkroom interface by Jason Row Photography, on Flickr


Editable histogram and other tools by Jason Row Photography, on Flickr


Many post production tools are on offer by Jason Row Photography, on Flickr

Tethering: The tethering module allows you to shoot images directly to your computer via a USB cable attached to your camera. The image can be previewed live on your computer screen and certain elements of the camera control can be changed from the computer. Digging into Darktable's manual I could not immediately find a list of supported cameras but there was a command line tool to determine if your camera is compatible. 

Map: The map tool allows you to geotag selected images on a map. Darkroom appears to use OpenStreetMap for its mapping, which whilst not as visually appealing as Google Maps, still gives you good location details for most parts of the world. To the right of the map module are map setting and another option for tagging the image. 


The map module for geotagging] by Jason Row Photography, on Flickr

Settings: Unlike the polished Windows and Mac apps we are used to, the settings menu in Darktable is a little clunky to use and initially difficult to find. It is in fact a small gear icon below the modules section which opens a dedicated preferences window. It is here that Darkroom loses some of the slickness of its interface, falling back into complicated, unclear options. 

Overall Darktable is an extremely powerful tool for those photographers on a limited budget. Its limitation is that it works only on Linux or OSX however, Linux is a free operating system and much easier to install than before. You can also run Linux virtually through a virtual machine on Windows.

Whilst not a slick as Lightroom or Aperture, Darktable offers many of the facilities of those products for the price of free. For that reason alone, I would have to recommend it.

Leave a Comment


Monday, March 17, 2014

Essay: What makes a good photograph.


Essay: What makes a good photograph.


How to Get Your Photography Into Galleries – PictureCorrect


How to Get Your Photography Into Galleries

Getting your photography into a gallery can be difficult without knowing how the entire process works. Experienced photographers Lois Youmans and Sandra Carrion share their insights and advice on how to get your work out there and seen by galleries in this helpful seminar:


Getting Recognition

To do well in photo competitions and increase your chances of getting seen by a gallery, you have to think ahead and consider what the judges and gallery curators are looking for.
  • Submit a cohesive gallery of images. Choose a theme and stick with it.
  • You don't need expensive equipment to take great photos, you have to have an eye.
  • Don't expect to be found, you have to make an effort to be seen.
  • Build a professional resume/curriculum vitae. Include an artists statement.
Among some of the other tidbits of advice, and the seminar is packed with helpful hints. The presenters instruct viewers on how to build a personal brand and utilize social media to build buzz around their artwork.
getting_into_galleries_1
One of the most important things discussed in the presentation is to keep in mind that a gallery will spend money to have an opening for your work. They will, or should be, spending money on advertising and promotions to get people to come see your work, so it's important to know what each specific gallery is looking for beforehand. Make the effort to learn about the galleries before you make an appointment to review your portfolio. No one likes their time to be wasted!

Thursday, March 13, 2014

Create Cinemagraphs on Windows | Photofocus


Create Cinemagraphs on Windows

cliplets
On Monday, we told you about a new program called Flixel for Mac which makes the cinema graph process very easy.  Over in the Photofocus forums, a reader (Bruce Goren) told me about a similar program from Windows.
fountain
Microsoft Research (a test group inside Microsoft) has been experimenting with what they call Cliplets.
Microsoft Research Cliplets is an interactive app that gives users the power to create "Cliplets" — a type of imagery that sits between stills and video, including imagery such as video textures and "cinemagraphs". The app provides a simple, yet expressive way to mix static and dynamic elements from a video clip.


You can try out the beta software for free (and this one is Windows only).
Candles4
______
This Post Sponsored by:
Photoshop World, the ultimate Photoshop, Photography & Lighting Conference. Atlanta GA, April 8-10.  Use the promo code PSWFOCUS414 to discount $50 OFF a full conference pass. Learn more in three days than you have in three years! 
ViewBug  Stick With ViewBug & Photofocus throughout 2014 – because we're announcing the biggest contest in Photofocus history — coming soon!
The HDR Learning Center Check out new ways to use High Dynamic Range photography to make compelling images. Free tutorials and posts to get results. Produced in partnership with HDRsoft.
Mosaic A complete solution for photographers using Lightroom who want to manage and share their photos. You can easily view images with their iOS app or web service. Plus your photos are backed up to the cloud with several plans to match your needs. Be sure to also check out the Lightroom Learning Center to learn new ways to work in Lightroom.
lynda.com Learn photography anytime, anywhere, and at your own pace—from bite-sized tutorials to comprehensive courses. Try lynda.com free for 10 days by visiting lynda.com/ Photofocus.
The Topaz Labs Image Enhancement bundle. Open up a world of creative possibilities with a seamless, integrated workflow. You don't need to be a Photoshop wizard to look like one. Click here and use the code photofocus to get a 15% discount.

Want to Make Cinemagraphs? Mac Users, Here’s a Limited Time Deal. | Photofocus


Want to Make Cinemagraphs? Mac Users, Here's a Limited Time Deal.

cmpbanner
I've been exploring cinemagraphs for sometime now… the technique of creating living photos with subtle movements.  I've got my own workflows mastered using Photoshop and After Effects, but I'm always curious when a new tool comes on the market.
Electric3
At WPPI, I saw a new product called Cinemagraph Pro from Flixel.  This makes the process incredibly easy. Essentially you import a video clip (up to 4K in resolution), and then paint to mask out the area where motion occurs.
electricUI
The product lists for $199… which I think is too high.  The company provides a reasonable justification that this is a pro tool aimed at a high-end niche market.  With that said, its on sale for $14.99, which is too cheap (but I'm not complaining).  This deal is Mac only and expires Thursday, March 13th (from my experience that means 12:01 am Thursday EST)… so if you want it, get it ASAP.


No, I don't know if it will ever come for Windows.  No I don't know if the price will change or when.  I do know the product is easy to use and works 98% the way I want it to out of the box. I also really like that the Flixel player works directly on the Twitter timeline.  If you're intrigued by motion, have $15 and a Mac… pick it up now.
______
This Post Sponsored by:
Photoshop World, the ultimate Photoshop, Photography & Lighting Conference. Atlanta GA, April 8-10.  Use the promo code PSWFOCUS414 to discount $50 OFF a full conference pass. Learn more in three days than you have in three years! 
ViewBug  Stick With ViewBug & Photofocus throughout 2014 – because we're announcing the biggest contest in Photofocus history — coming soon!
The HDR Learning Center Check out new ways to use High Dynamic Range photography to make compelling images. Free tutorials and posts to get results. Produced in partnership with HDRsoft.
Mosaic A complete solution for photographers using Lightroom who want to manage and share their photos. You can easily view images with their iOS app or web service. Plus your photos are backed up to the cloud with several plans to match your needs. Be sure to also check out the Lightroom Learning Center to learn new ways to work in Lightroom.
lynda.com Learn photography anytime, anywhere, and at your own pace—from bite-sized tutorials to comprehensive courses. Try lynda.com free for 10 days by visiting lynda.com/ Photofocus.
The Topaz Labs Image Enhancement bundle. Open up a world of creative possibilities with a seamless, integrated workflow. You don't need to be a Photoshop wizard to look like one. Click here and use the code photofocus to get a 15% discount.

Understand Exposure in Under 10 Minutes


Understand Exposure in Under 10 Minutes

A Post By: Annie Tao

DPS-Annie-Tao-Exposure-article-perfect-exposure-exampleThere are countless Photography books and classes that explain exposure, yet after reading or attending them, your photos may not have improved because…well, let's be honest… some of us Right-Brainers aren't super technical!

I recently taught a small photography class to newbies. I thought hard about how I could explain exposure in the simplest way possible. I found that a parallel example of something relatable was the best way to convey the different aspects that impact exposure.

I tested this theory by explaining exposure to my 8-year old daughter and then quizzed her. She proved the theory was a success by grasping the concepts within 10 minutes. So I'd like to share my lesson with you so you can understand exposure in under 10 minutes!

A 10-minute lesson that will change your Photography

Your DSLR camera is like your head with the LENS being your vision and the camera BODY is your brain. Your vision sees things and your brain records the details.

DPS-Annie-Tao-Exposure-article-camera-metaphor

Just like when you look at something – let's say, a flower – your eyes see it and send information to your brain that the flower has long petals and that it is yellow. If you looked at it too quickly or it was too dark, for example, the information your brain records is compromised.

The "exposure triangle" is about how 3 things — aperture, shutter speed and ISO — work together to provide enough light for your brain (the camera) to record what you see. You need the right combination of these 3 components to have perfect exposure.

DPS-Annie-Tao-Exposure-article-perfect-exposure-example

Good exposure

For example, if you don't let in enough light, you won't see things very well because it'll be too dark (underexposure).

DPS-Annie-Tao-Exposure-article-underexposure-example

Too dark, or underexposed

If you let in too much light, then it'll be too bright and you can't see a lot of the details (overexposure).

DPS-Annie-Tao-Exposure-article-overexposure-example

Too bright, or underexposed

APERTURE = how WIDE you open your eyes

A small aperture (a large f-stop or f-number, like f/22) is like squinting. A large aperture (a small f-stop or f-number, like f/1.4) is like having "bug eyes".

Quiz:  If you are shooting in low light, how wide do you open your eyes? Will you see well at night if you are squinting (small aperture)?

Quiz:  What happens on a super bright day if your eyes are wide open and they're open for a long time (slow shutter and large aperture)? Can you see well then?

DPS-Annie-Tao-Exposure-article-fish-with-eyes-open-wide-and-squinting

Aperture is how big you open your eyes – bug eyes, or squinting

SHUTTER SPEED = how LONG you open your eyes

A fast shutter, like 1/1000th of a second, is blinking super fast. A slow shutter speed, like 2 seconds, is keeping your eyes open and then blinking. The thing to remember is:  your brain is recording everything when your eyes are open. So if you or something you're looking at is moving, and your eyes are open a long time (slow shutter), then your brain will record a blurry image.

Quiz:  If you want a crisp shot of someone jumping, how long do you need your eyes open? What will freeze the shot:  a quick blink (fast shutter) or a slow one (slow shutter)?

DPS-Annie-Tao-Exposure-article-moonglasses

ISO special glasses

ISO = special glasses that help you see in the dark

ISO is like the opposite of sunglasses. Let's call them MOONglasses!  ;)

The higher the ISO, the thicker your moonglasses, so the more you are able to see in low light. You need thick moonglasses (high ISO) when shooting indoors or at dusk. You need very thin moonglasses (low ISO) when it's a sunny day.

Quiz:  do I need thick, thin or medium moonglasses if I'm shooting at the beach on my lunch break?

All 3 of these things work together

Here is an example:  You are photographing your sleeping cat who is snuggled on the couch. There is not much light coming through the windows or additional ambient light. To see well, you have medium-to-thick moonglasses on (such as ISO 600). You need to have your eyes open pretty wide (large aperture, such as f/1.4). However, you don't have great vision (you have a kit lens that only goes up to f/4.5), so you need more light to see. Thus, you leave your eyes open longer (slow shutter speed, such as 1/30th sec).

Final Quiz:

  1. In the same scenario, your cat notices you are snapping photos, so she starts walking away and leaps off the couch. You still want to photograph her. Which would you change:  how open your eyes are (aperture), how long you leave your eyes open (shutter speed), or thickness of your moonglasses (ISO)?
  2. If you increase your shutter speed because you want to freeze the image, what else would you need to change? (If you changed nothing else, the image would be too dark because you let in less light.)

Once you get the basic concept of exposure and how the three components of the exposure triangle (aperture, shutter speed and ISO) work together, turn your DSLR camera to "manual" and practice the specific settings based on different circumstances.

Want more on exposure?  Try these:


Monday, March 10, 2014

6 Photography Lessons From a Combat Sniper - DIY Photography


6 PHOTOGRAPHY LESSONS FROM A COMBAT SNIPER

6 Photography Lessons From a Combat Sniper
We see them in movies, we watch History Channel specials about them, and they are the things of which legends are made. Surprisingly, no, I'm not referring to UFOs. We're talking about combat snipers, those lethal ghosts in face paint shifting in the shadows.
I began contemplating the possible parallels between photographers and these men of mystery, and, as I have rarely ever fallen into a category that the military deems as useful for more than civilian life, I sat down one evening with a friend and former U.S. Army sniper to get the lowdown on what life as a precision shooter is really like. As we sat around a crackling campfire beneath a mesh camo canopy, I was intrigued and somewhat surprised as Andy (because heroes literally care that little about protecting their identity) recounted stories of combat missions in the mountains of Afghanistan. But, as we continued to talk, I began to see more and more the applicable parallels between these elusive soldiers and those of us in the metaphorical "trenches" of photography. (There's really no comparison, I know…)

1. Know Your Equipment and Your Skills

This is paramount to being effective in your role — fully understanding the capabilities and limitations of your gear and knowing how your skills align with that. Having the most advanced camera system in the world does you nothing if you are not competent in using it. I have seen images from photographers who spent thousands on equipment that do not compare to those of an adept photographer with a glorified point-and-shoot. And, likewise, there are limitations to your effectiveness if the job requirements extend beyond the facility of your gear. I mean, let's be real…you aren't going to shoot high-speed "bullet time" images with a single Kodak Easyshare.
NOTE: If you can, we want to know about it! Strap the details to the back of a pigeon, and set it free!…if it comes back to you, it was probably hungry.
You need to be aware of the environmental limitations of your equipment as well. If there wasn't a moon or at least stars shining in the mountains of Afghanistan, night vision optics were of no use and soldiers had to blindly feel their way along the rugged terrain. Sometimes, no amount of trying and finagling or DIY-ing will allow you to do what you want (although we still try our darndest, regardless). It's okay…it happens… Just move on and adapt.
sniper-photography-01

2. Observation Is As Important As Engagement

Contrary to the illusion many have from Hollywood of a sniper's role, much of the time spent in the field is comprised of reconnaissance. So often we think of photography as being all about capturing the subject or documenting the moment, but, more often than not, we need to take the time to just observe what's in front of us. Situational awareness is vital to not only understanding what we're seeing but also calculating our plan of attack. Simply rushing in and opening fire like Rambo is not an effective method for exacting the results we want.
sniper-photography-02

3. It's a Waiting Game

While most people would be jumping at the opportunity to join the elite ranks of sniperhood, Andy recounted how one of the snipers in his unit simply…quit…because it was so damn boring. In the same vein as calculated observation, photography is often a waiting game…exercising patience, as hard as it may be sometimes, lying in wait for that one, specific shot. Perhaps it's waiting for the subject to come into frame to compose that once-in-a-lifetime image, or maybe it's enduring while a scene unfolds in front of you to present the perfect opportunity or the sun to hit those trees at that specific angle. Whatever the case may be, patience is a virtue which few possess but one that will ultimately pay off.
sniper-photography-06

4. Remain Calm and Focused

I am often guilty of becoming trigger-happy when unleashed on a photographic opportunity, whether it's an in-studio client, a documentary subject, or my own kids running around the yard. I tend to go nuts sometimes, filling up half a memory card (more or less) without ever bagging anything really good. We photographers want to capture EVERYTHING, not missing a single opportunity, and while there are situations that absolutely call for "spraying-and-praying," most of the time if we paused to take a breath and collect our thoughts, we would be able to capture a much more dynamic work. True photography is about quality, NOT quantity. Just imagine if Ansel Adams had tried to burn through slides as quickly as possible…do you really believe we would have the awe-inspiring, iconic images now synonymous with his name?
sniper-photography-03

5. Choose the Right Gear For the Situation

When heading into enemy territory, there were many things to take into consideration. Do you take a backup weapon in the event you find yourself in a firefight? Do you grab a SAW with a higher rate of fire but less reliability, or do you take an M4 with less capacity but fewer chances of error? There will be no resupply during the mission, so how much food and water do you lug around with you? How much will be consumed along the way?
Photographers are often faced with a similar dilemma: Do you weigh yourself down with a full-frame body and an array of lenses, or do you opt for a smaller body and single prime lens? Will you be moving around a lot, or does the situation call for a more stationary position? Street photographers, for instance, are notorious for keeping it simple, sticking with a typically-small body and prime lens, while a wedding may require a double-camera harness and zoom lenses, and a commercial shoot might require an entire set with medium-format cameras, lighting and assistants. Each scenario is different and should be treated individually. Make the best choice of gear to provide ample flexibility without incurring unnecessary encumberment.
sniper-photography-05

6. Practice Builds Skill and Confidence

There's no way around it: repetition builds perfection. A sniper spends countless hours at the practice range and on simulated missions to not only increase proficiency but to familiarize the soldier with their true capabilities and potential. There's a difference between hoping you can make that headshot at 800 meters and knowing that you can, and that knowledge only comes through repeated successful execution of the drill. And, the practice does not simply end when you graduate from sniper school!
If we photographers took all the time and energy that we put into theory and talk and, instead, channeled it into hands-on application, is there really any limit to what we could create? Get out there and shoot! Give yourself challenges; set regular goals to keep yourself in regular practice. Because, if you're not advancing, you're regressing.
Looking for a place to start? Check out 25 Ways to Jump Start Photography Inspiration!
sniper-photography-07
You are a well-trained, precision executor of visual art. (Hoorah!) There is no need to be otherwise. It's not the biggest, the baddest, or the toughest who make it through sniper school; it's those with determination, focus, and a sense of purpose who make it into the ranks of the elite.
(And you don't even have a CO yelling at you to carry 150 lbs. of gear on a 30-mile march!)
*Photos courtesy of Andy Plank