Regular Price $379
Now until Dec 2nd, get the Complete Topaz Labs Collection for $199
Here is the direct link
http://www.topazlabs.com/839.html
Photographic photo papers are designed to produce a high quality image in an effort to best reproduce the photographed object. How good or bad the paper is at meeting this objective will depend on the type of printer, type of ink and of course the subject of this guide; the type of photo paper. In this guide we will explain the various considerations to take into account when evaluating your options.

The mostly widely adopted technology by the professional printing community is the Inkjet printer technology. Laser printing is able to outperforming Inkjet printing in terms of speed, but it lacks the accuracy that high quality photographs require. Laser uses melted powder-like substance in CMYK colours, while Inkjet uses the same colours though liquid ink form that are delivered to the paper by means of small jets (hence Ink-Jet). This method of printing can achieve 2880Dpi vs. 720Dpi commonly found in laser printers. Therefore from here on, the various parameters for choosing photo paper will refer to the Inkjet type.
Most printers will support universal compatibility. The fact that you own a major manufacturer's brand of printer does not limit you to its range of printed media. For example, an HP printer will naturally support its range of papers as well as these papers produced by other manufacturers. The difference lies in the setting part of the printing process, in which you have to decide on paper size, quality, finish and other printing attributes. Choosing your own printer's brand of paper will mean that settings are pre-configured, though do not let this put you off from considering other brands. Many manufacturers and particularly the professional niche players the likes of Ilford, Hahnemuehle, Innova, etc. are able to provide you with a colour profile file. This computerized file will adjust the printer settings for you. During your research, keep an open mind as to your options and consider photo paper from various brands as long as they meet your criteria.
The first aspect that consumers often evaluate is the photo paper finish. It is a translucent chemical coating that is designed to improve the appearance of the print which otherwise may appear dull. The problem lies in the inconsistent terminology that brands use to describe their finish and the headache of making sense of which is which. Common options include matt, glossy and satin, but when consumers come across terms such as semi-gloss, pearl, luster and other finishes, confusion is likely to occur. Here are the most common options you will come across.
The quality of photo paper is measured in colour range, archival properties, instant dry to touch and other factors of quality. It is the 'receiving layer' that determines it. This chemical layer is designed to receive the huge amounts of ink laid by the printer during the printing process. Without one, the paper will soak from ink, the ink will penetrate to the other side and will fade in a matter of months. Basically, the result you get when printing a photograph on copy paper. There are two common type of receiving layer that cover most photo papers:
Photo Paper Weight
The last consideration that consumers are faced with is the weight of the paper measured in GSM or if you will, the weight of paper per one square meter of area. Contrary to what you might think, GSM does not equal quality of print but higher GSM leads to thicker photo paper which at times can be useful but in other times, a waste of money. As a measure of paper density, higher GSM weight feel thicker when held hence you will often come across greeting card papers boasting GSM weight on the high end of the spectrum, while prints with low keepsake potential such as brochures that will likely be discarded quite quickly will feature more modest GSM weight.
We hope this has helped evaluate your photographic photo paper options.
This guest post was written by Joseph Eitan, the managing director of Photo Paper Direct. Joseph has over 25 years experience working in the paper and printing industry as the managing director of several companies.

|
Always known as the workhorse of the photography world, DSLR cameras have become increasingly more available than ever before. This has created a new brand of buyers called "prosumers." These buyers are looking for a camera with maximum flexibility, creativity and rugged design. In a class of cameras that has generally been reserved for the professional photographer, all of the major manufacturers have now released DSLR cameras that are suited for use from the budding photographer to the creative professional. Check our picks this season's top performing DSLR cameras. If you don't see the perfect camera in the list we've provided, be sure to seek out buying advice in our "What Camera Should I Buy?" discussion forum. Our forum members, moderators, and staff will graciously offer their insight in helping you pick the best camera for you. |
|
As a serious professional photographer, there is so much to love about the Mark III. Canon pulled out all the stops for this full-frame DSLR. This supercharged camera has the ability to produce amazing images with its 22.1MP CMOS sensor. With the ability to produce beautiful HD quality video, the only thing standing in your way might be the $3,400 price tag. Rating Average: 9 out of 10 | |
| #2 Nikon D800
Nikon introduces the D800 as the highest megapixel DSLR in their lineup. With an unheard of 36.3MP FX-format CMOS sensor, we are surprised the pixels aren't falling off the sensor. Speaking of sensors, Nikon has unleashed a newly designed sensor for the D800. It promises to have great dynamic range and extraordinary color sensitivity. Priced at a mere $2800, this camera makes us wonder if medium format digital camera companies are getting a little worried. Thinking about the D800, but the camera seems a bit much for your needs? Check out the Nikon D600 (new for $1900). It's a great camera as long as you don't pick up one that has dust issues (refurbished for $1500). Want to avoid the dust issue? Try a D610 with a new shutter mechinism for $2,000 instead. Rating Average: 9 out of 10 Read the Nikon D800 Review | |
| #3 Pentax K-3
The Pentax K-3 is available for $1300 (body only) just in time for the holiday season. Rating Average: 9 out of 10 (initial reaction) Read the Pentax K-3 Comparison (full review in process) | |
|
The EOS 70D is Canon's latest addition to its midrange DSLR line, targeting "advanced amateur photographers and photo hobbyists". The camera retains an APS-C sensor and 1.62x crop factor like its stable mate 60D; resolution increases an insignificant 2 megapixels to 20. More importantly, the new camera features a Canon DIGIC 5+ image processor and the 3-inch articulating LCD monitor acquires touchscreen functionality. The native ISO range extends an additional stop on the high end from 100 to 12800 and is expandable to 25600. The autofocus system features a new dual pixel CMOS phase detection design that permits continuous AF during video capture, and incorporates 19 focus points instead of 9 on the earlier camera - with all 19 being cross focus, including a high-precision f/2.8 dual cross-type AF center point. Fantastic video, however, is what the 70D does best. This is the first DSLR at this price point with video quality that will appeal to budding videographers and budget minded independent filmmakers. Purchasing this camera with the 18-55mm IS kit lens retails at only $1100. Rating Average: 9 out of 10 | |
| #5 Nikon D7100
The D7100 is light and compact--especially when compared to the DSLRs listed above. The camera is great for budding photographers and professionals on a budget. The D7100 has a price tag of $1,150 for the body only. Rating Average: 9 out of 10 | |
Want to know which cameras are tops in the minds of DigitalCameraReview's readers? Check out our Most Popular Cameras list, based on traffic across our site!
|
Sometimes a point and shoot is all you want. Being able to slip a sleek, slim line camera into your pocket for a night on the town or a family get together is convenient and easy. Where DSLR's can seem large and intimidating, point and shoots allow subjects to be relaxed and easily photographed. Also, more of the point and shoots are equipped with Wi-Fi technology making it easy to post your pictures to social media and image hosting websites. Check out our selection of top point and shoot cameras for this holiday season. If you don't see the perfect camera in the list we've provided, be sure to seek out buying advice in our "What Camera Should I Buy?" discussion forum. Our forum members, moderators, and staff will graciously offer their insight in helping you pick the best camera for you. |
| #1 Fujifilm X20
I love, love, love the Fuji X20. The manual zoom lens is perfect for those that shoot DSLRs. And the Fuji colors bring your image to life. The Fuji X20 comes equipped with an advanced 12MP 2/3 inch X-Trans CMOS II Sensor and the EXR Processor II to deliver the world's fastest autofocus speeds in its class. The X20 also receives a new, advanced optical viewfinder. Additionally, a highly randomized and unique color filter array on the new sensor eliminates the need for an optical low-pass filter. The X20, like the X100S, has been given an Intelligent Hybrid Autofocus system that allows the camera to switch between phase and contrast detection to achieve the best image. The Fuji X20 uses the premium FUJINON F2.0-2.8 4x manual zoom lens. The lens also offers Super Macro Mode where users can get as close as 0.39 inches from a subject. The X20 has a 2.8-inch LCD screen with 460k dots. Like the X100S, Fuji also left the "Q" button function on this camera which allows users to easily access frequently used menu items. The Fuji X20 is available for $550. Don't need the new viewfinder? Check out the Fuji X10. It's available for as little as $340! That's a steal of a deal for this awesome camera. Rating Average: 9 out of 10 (initial reaction) Read the Fujifilm X20 Image Gallery (review in progress) | |
| #2 Canon G15
But the Canon G15 is also a fantastic choice for a great point and shoot camera. The camera features a 12.1-megapixel 1/1.7-inch CMOS sensor with the latest generation Digic 5 Image Processor. This sensor is on the larger size for point and shoot cameras. Also, the Digic 5 has some pretty significant improvements over the last version. The Processor has increased speed and power. It also has improved noise reduction to help the camera reduce grain in high ISO images. The camera offers a ton of manual functionality for those that require it, but also can be used easily by those that don't. The G15 is available for $450. Want Wi-Fi? Go for the new G16. It's practically the same camera as the G15 with Wi-Fi added. It sells for $550. Rating Average: 9 out of 10 Read the Canon G15 Review | |
|
The stellar video and sound quality put this camera in the top five list. Very few point and shoots can offer the quality and sleek design packed into this small, but formidable camera. The Sony RX100 is available for $600 and it's a beauty. Rating Average: 9 out of 10 | |
| #4 Olympus TG-2
Olympus decided to change the "rugged camera game" with their newest addition--the TG-2. I knew this would be a good camera when I first saw it at CES. But I didn't realize how much I would love it until it was shipped to me for a full review. I immediately knew this was not your typical rugged camera. The TG-2 performs with the precision and speed of Olympus' top rated cameras. It has a 12-megapixel CMOS sensor and a 3-inch OLED screen. But the best part of this camera is the bright f/2.0 lens (an exceptional feature for a point and shoot at this price point) that does a great job of capturing images with good depth, color and contrast. It has a 4 times optical zoom and a 4 times digital zoom (if you absolutely must use it). The Olympus TG-2 sells for $360 and is worth every penny. Rating Average: 9 out of 10 | |
| #5 Samsung EX2F
The 12 megapixel Samsung EX2F is a well built imaging tool that was obviously designed for serious photographers. No worries, though, if you are not already a great photographer. This camera will make it easy to take a fantastic image. The Samsung EX2F sells for $320. It's the least expensive camera in this category. Make no mistake. This camera is well built for years of use. Rating Average: 9 out of 10 | |
Want to know which cameras are tops in the minds of DigitalCameraReview's readers? Check out our Most Popular Cameras list, based on traffic across our site!
|
The newest class of digital cameras to the holiday guide is mirrorless compact interchangeable lens cameras. This class of cameras has given the user the flexibility of interchangeable lenses like the DSLR photographers, but the convenience of a smaller size due to a mirrorless design. Whether you are a budding photographer or an amateur shooter, this type of camera is designed for the creative person who loves the flexibility of multiple lenses. Find our top choices for mirrorless cameras in the link below. If you don't see the perfect camera in the list we've provided, be sure to seek out buying advice in our "What Camera Should I Buy?" discussion forum. Our forum members, moderators, and staff will graciously offer their insight in helping you pick the best camera for you. |
|
Is this high-end mirrorless really worth it? The answer is a resounding yes! The E-M1 features all of the great functionality of the E-M5, but the E-M1 offers better ergonomics and better button placement than its predecessor. But this high end ILC comes at a price. Body only, the camera is $1,400. Want to purchase the E-M5 instead? You are still making a great purchase. The E-M5 still sells for $1,300. It's a great camera that is retaining its value. Rating Average: 9 out of 10 | |
|
The camera has an MSRP of $800 and includes either the 18-55mm or 20-50mm lens. However, we were able to find holiday deals for only $570 with the 20-50mm kit lens and the 50-200mm lens. Talk about an amazing deal! Rating Average: 9 out of 10 | |
|
Designed for those that value style, quality build, and beautiful form, the Fuji X-Pro 1 does not disappoint. The Fuji X-Pro 1 is available for $1,200, body only. Rating Average: 9 out of 10 | |
| #4 Sony a7R
I recently spent a week shooting with the a7R in Nashville, Tennessee. The camera is a workhorse and built to withstand heavy use. The camera features the new Bionz X image processor (just like the RX10), fast AF capabilities, full HD 60p video recording, and Wi-Fi /NFC connection. It offers fully customizable controls and functions: 9 customizable buttons and 46 assignable functions. The camera has a 2.4 million dot XGA OLED Tru-Finder and a tiltable 3-inch LCD screen. The Sony a7R will be available just in time for the holidays for $2,300 body only. Also available from Sony is the new a7. An ILC with a 24-megapixel full frame sensor. It is available for $1,700, body only. Rating Average: 8 out of 10 (initial reaction) | |
|
The Samsung Galaxy NX Camera features the same 20.3-megapixel APS-C sensor found in the NX line of cameras. The sensor offers a hybrid autofocus system. It features a huge 4.8-inch fixed LCD touchscreen, SVGA electronic viewfinder and very similar user interface as what we saw in the Galaxy Camera. The camera is powered by a 1.6 GHz Quad-core processor. It is 3G/4G LTE and Wi-Fi compatible for constant connectivity and sharing of images. It has a maximum shutter speed of 1/6000 of a second and hast 8.6 frames per second continuous shooting speed. The body style is very similar to the NX20 -- giving users a nice sized hand grip. Rating Average: 8 out of 10 (initial reaction) Read the Samsung Galaxy Preview or check out the Image Gallery | |
Want to know which cameras are tops in the minds of DigitalCameraReview's readers? Check out our Most Popular Cameras list, based on traffic across our site!
#1 Sony RX1
 While the initial excitement surrounding the 24 megapixel RX1's launch was based mostly on the fact that its compact body is built around a full-frame sensor, enthusiasm and respect, for this camera doesn't stop there. Once you start shooting with the camera, you understand that beyond the sensor size, the RX1 is special from its solid build and design to the camera's consistently amazing image quality.
Although it costs more than some higher end DSLRs, the RX1 makes a great second camera for pros and semi-pros and will probably appeal to photographers who want excellent quality in a convenient, compact body. The RX1 sells for $2,800.
Rating Average: 8 out of 10
#2 Fuji X100s
 Besides having some heart-palpitating good looks, the X100s has many other things going for it. For starters, the camera's heart is a 16.3MP APS-C sized X Trans II sensor. While that right there is a lot to swallow, note that the sensor has been revamped for better high ISO noise processing and there are now phase detection sensors on the semi-conductor. And in front of the heart is the other lip-biting feature--the lens.
The X100s has a permanently fixed 23mm f2 lens with Fujinon glass comprising its design. Fujifilm has been in the business of optics for many years and have made what many professionals may consider some of the best lenses ever made in the medium format and large format territory. Bringing that knowledge down to the APS-C level, this lens renders a 35mm field of view due to the 1.5x crop factor of the APS-C sized sensor. Around this lens is an aperture ring--which will tug at the nostalgic memories of many experienced film photographers and retro-infatuated enthusiasts.
The Fuji X100s sells for $1,300.
Rating Average: 9 out of 10
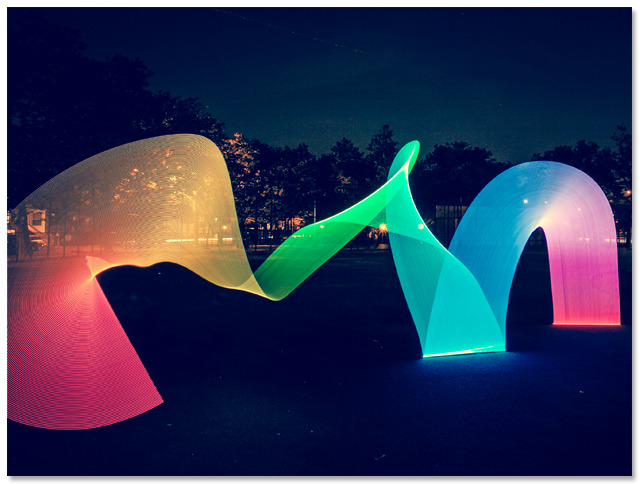
"Pixelstick reads images created in Photoshop (or the image editor of your choice) and displays them one line at a time, creating endless possibilities for abstract and/or photorealistic art. Taking this one step further, Pixelstick can increment through a series of images over multiple exposures, opening up light painting to the world of time-lapse, and allowing for animations the likes of which have never before seen."
The untamed beauty of the landscape and its unpredictability is what attracts me most to this field. The idea of photographing a moment in time that was not the result of orchestrated efforts, but rather the erratic temperament of nature, is a source of great inspiration for me. This lack of control means that as a photographer, I must adapt my workflow to compliment the environment, using in-the-field techniques to create the image I want to express.
Perspective plays a key role in manipulating an environment I have no control of – the conscious choice of vantage point and placement of the horizon line can greatly improve the balance, flow, and overall success of my composition. However, altering the perspective is more than simply choosing where to place and position my camera. By making deliberate technical choices in my gear, I can develop my ability to improve a composition without sacrificing my vantage point.
Longer focal lengths will decrease your depth of field, but also bring forth the background/ foreground elements – you're basically compacting the distances, making objects around your main focal point appear to be much closer to it than they really are. Alternatively, wide focal lengths will exaggerate those distances, making objects appear to be much further away from your focal point.
Adjusting the focal length is a method I use often in the field when I want to redistribute the weight of my main subject(s) for a more balanced composition. Below are two images that show how differently your composition can appear by simply changing your focal length. Both these images were taken on the same evening, within minutes of each other.

The scene above was captured with an 85mm lens, set at f/11, with the focus locked on the foreground wheat. Since I was focusing so closely, I was able to obtain a shallow depth of field with a relatively small aperture, throwing the lighthouse and sunset sky into some degree of obscurity. The reach of 85mm was able to pull all the elements together and compact the distances between the background sky and tree line, middle ground lighthouse and pier, and foreground wheat.
Alternatively, the image below had a much different workflow. The approaching thunderstorm made for quite the sunset display, so a wider focal length of 24mm was needed to capture the entire scene. Using a deep depth of field at f/16, foreground to background was rendered in sharp focus. The distances between the foreground, lighthouse, and background had been exaggerated, making the environment seem much deeper than it was in reality.

I was standing in the same position for each image, but the 24mm lens made the lighthouse seem much further away, while the 85mm compacted the distances and brought the focal points closer together.
Focal lengths also affect your depth of field, despite using the same f/stop. The longer your focal length, the more shallow your depth of field will be for a given aperture – which explains why the 85mm image had a very shallow depth of field, despite using an aperture set at f/11. So not only can you use your focal length to control your depth of field, but you can also use it to manipulate your environment – pushing elements further back, or bringing them forward.
Even with the same lens, you can drastically alter the composition and content of your environment simply by controlling your depth of field. Aperture certainly has a prominent role to play here, but other elements affect your depth of field in a profound way, such as distances, placement of focal point, and your focal length (as mentioned above). I go into further detail on how to control your depth of field in my eBook The Art of Bokeh, but for now I want to demonstrate how differently your perspective can change by exploring different depths.

The image above was taken under sunset light filtered by a thin layer of clouds, side-lit as it descended towards the horizon. I used my 24mm f/1.4 lens, with the aperture set wide open, to capture this unique shoreline rock with a very thin slice of focus.
The photo below was taken the same evening just moments prior, and with the same lens. Instead of focusing on the rock and making
that my main focal point by isolation, I turned towards the setting sun and set my aperture to f/16. By simply changing my vantage point and depth of field – moving away from the rock and widening my frame to include more of my environment – I was able to create two entirely independent images from the same location and conditions without ever changing my lens or gear.

Any element of your landscape can be a potential focal point – from grand vistas to small pieces of foliage. While the volatile forces of nature may constrict your ability to manipulate the environment, it does not mean that you have to limit your compositions. I find this lack of control to be quite liberating – allowing yourself to be influenced by the environment, which can be conducive to your development as a photographer. By using your skills to direct a composition, you can transform mundane subjects into textured focal points of light and shadow, creating a successful representation of your vision.
Landscape photography can call on many different photographic techniques in order to find a successful perspective – long exposures, macro, panoramics – and can require various combinations of apertures, focal lengths, shutter speeds, and vantage points. The opportunities are endless, and are only limited by the creative boundaries that you define for yourself. Look around your environment and fully embrace the light and texture you see; try new techniques and explore different subjects, and don't let the assumed quality of your atmosphere discourage your endeavors. If you find your surroundings uninteresting, pursue other parts of your environment by changing your perspective – you may be pleasantly surprised by what you find.
To download an expanded version of this guide as a free eBook, click here.
This is a three part series on the somewhat complicated, but incredibly beautiful art of exposure blending your images. This article here helps to explain the theory behind it all, and my next two articles will give you step-by-step instructions on how to:
1. capture images for exposure blending properly, and
2. how to blend the bracketed images manually in Adobe® Photoshop CS6.
At the end of this tutorial, you'll see how to take an evaluative image (left), and blend multiple exposures together for a complete tonal range (right):

Exposure blending is one of the most powerful ways to create a stunning photograph. As you've probably noticed, it can be difficult to capture an entire landscape accurately (especially those with a sky) because your camera sensor is limited to one aperture and one shutter speed at a time – it's not possible to have two different settings within the same frame. You'll often note that your photos rarely live up to what you actually saw – exposure blending is one way to overcome the limitations of your camera and photograph a landscape with the full tonal range that you see in the field.
Simply put, in order to have a well-exposed landscape you'll need one image exposed for the brightest tones in your photo (typically the sky) and another for the darkest tones (the ground, usually) when the lighting isn't suitable to capture it all in one exposure – think of sunsets and how differently the natural light level is when you compare the sky to the ground. Once you have your two extremes, you'll blend them together to make one perfectly exposed landscape.
I love to use visuals so let's look at my image below. As you can see, the setting sun is beautiful but caused some problems in exposure…the image where the foreground is exposed well (slower shutter speed) has an extremely overexposed sky, while the photo exposed for the sky (faster shutter speed) has the foreground in complete shadow. To get a proper exposure, I would need to combine these two images to get my result shown – and that, my friends, is exposure blending.

In addition to these two photos on the extreme ends, a middle exposure (one that's been light metered for the entire frame using evaluative metering, which finds a middle ground between your fastest and longest exposure) is useful to have as well for any middle ground elements you need to blend in. At times, the gap between your fastest and slowest exposure may be so great that you end up skipping the optimal exposure for those elements that fall in between the two. An example of this would be the water in the above scene. Notice how the image exposed for the ground (left) has the water slightly overexposed, and the image metered for the sky (middle) has some noticeable shadows. A middle exposure was needed to balance this out, and is what you see in the final blended scene (right). For intricate images with vast tonal ranges, it's not uncommon to have 5 or more photos of the same scene at your disposal in order to avoid any lost data.
The range of your exposures will depend entirely on how bright your highlights are and how dark the shadows appear – in other words, how vast your tonal range is. For example, a cloudy day will have very little difference in values, but a sunset image may have 5 or more stops in your complete tonal range.
How do I combine different exposures? It's actually quite simple once you learn the technique – and DSLRs have made it a lot easier with auto-bracketing.
This is where the term "auto-bracketing" comes from since you're bracketing your images off automatically by capturing the same scene at different exposures within "X" amount of stops.
This allows you to capture three sequential images of different exposures without having to adjust your settings manually – it's very handy, and helps to streamline your workflow when you're presented with a wide tonal range that one exposure can not contain.
For more intense differences in lighting – as you'll often find for sunrises and sunsets – you'll still have to adjust your settings manually to capture more of a range in exposure than two stops (or whatever your camera's auto-bracketing limit is). I'll explain how to do this in the next article, but first I want to show you why you should auto-bracket instead of adjusting just one RAW file.
you can't really use as a photo, but all the information you need to create a photo is there. A RAW file is just that – you can't upload a RAW file to your website or email it to others without special viewing software, but you can take that RAW file and turn it into a universal image.
RAW is preferable to JPG in many ways, most notably because of image quality. When you take a photo in JPG format, it is instantly compressed – and this compression will take detail away from your photo, thus limiting your processing capabilities.
With a film negative, you can adjust the exposure by exposing the negative onto your paper for longer or shorter amounts of time. RAW allows you to do the same – at least, for a limited amount of stops. Since you're working with the unprocessed digital "negative", you can recover some blown highlights or blocked shadows by adjusting the exposure of your RAW file before converting it into a more universal file format for display or print, such as JPG or TIFF.
You can artificially adjust the exposure of a JPG image in post process, but this is not a true exposure adjustment and will not recover any data for you. In the example images, we can see the true benefit of RAW when trying to recover these blown highlights. In Figure 1, you can see that while the foreground is exposed accurately, the sky is noticeably overexposed – a common occurrence.

Figure 2 shows how much detail is recovered by reducing the exposure by two full stops in RAW editing. In contrast, Figure 3 displays the same reduction in exposure (two stops) for the JPG version. Since the JPG file holds no additional data, the exposure is artificially reduced simply by adding a layer of black tones – there is no recovery of data, and the photo looks noticeably worse than the RAW adjustment.


RAW does have its limitations however – it does not give you the power to shoot blindly with no regard to exposure, and it is always best to achieve a proper image in-camera. A RAW file will typically give you two stops of recovery capability – if you adjust the exposure more than two stops beyond the original exposure, you most likely will not recover any additional data and will start to notice the quality to deteriorate.
It's always best to capture the optimal exposure for a scene in-camera simply because you'll have more data in an actual photo than an image adjusted artificially – even if it's in RAW. The more data that is retained, the more detailed your image will be. Auto-bracketing is superior to RAW for the following reasons:
1. You may need more range in your exposure than what RAW can offer you. Typically, you can only adjust your exposure +/- two full stops in RAW before you start to see damage – depending on what you're photographing, you may need 3, 5 or even 10 stops difference between your brightest and darkest photos.[/box]
2. While RAW is a great, low-damage, accurate way to adjust your exposure, it's still better to capture the image with your camera to make sure you have the highest quality photo.[/box]
I'm going to compare a scene where I underexposed my photo by two full stops using auto-bracketing with my camera vs. dropping the exposure in RAW.
Taking the overexposed version that was adjusted in RAW from above and zooming in on the recovered sky (Figure 1), you can see that there is still some overexposed areas. When compared to Figure 2 – the photo that I took two stops lower with my auto-bracketing – you can see that more detail was retained in the sky that RAW could not recover.


So while RAW provides a great recovery tool, it's more of a "last effort" way to adjust your exposure when you have no other alternative, or if you only need a very minor exposure adjustment. Adjusting your exposure in-camera will always give you a superior quality when compared to RAW adjustments, and is worth the extra effort of auto-bracketing.
Blending exposures using one RAW file is best for those candid shots where you didn't have enough time to set up a tripod but need to correct some blown highlights, or simply want to brighten/ darken parts of your image – like in wedding or action photography. It's a fantastic way to save an otherwise unusable photo, but if you have the time and ability to auto-bracket your landscape for exposure blending, this is the method which will give you the highest quality output with the largest tonal range.
Exposure blending and bracketing is not just for combining bright skies with dark grounds – you can use it in many different ways. You can recover blown highlights in water reflections, use it as a no-damage way to dodge and burn your landscapes, or to blend a brighter foreground with a darker sky (like under stormy, overcast skies).
Another popular use of this technique is to blend different long exposures together – for example, blending an extended exposure that captures moving clouds with an image that shows stationary grass that would otherwise be windswept if taken at the same shutter speed as the sky: the possibilities are endless.
But first, you need to know how to get those exposures to begin with. In Part 2, I explain step-by-step how to capture different exposures the right way using a tripod.
To download an expanded version of this guide as a free eBook, click here.
While 2012 saw a host of excellent new full-frame and flagship cameras hit the market, 2013 brought plenty of innovation as the camera industry adapts to changing times. From more affordable full-frame cameras, to a slew of new incredible fixed-lens cameras aimed at enthusiasts, and even pod-like lens-cameras for your smartphone, the camera industry has been quick to try new things.
Still, with two new excellent flagships from Micro Four Thirds and improving performance across the board, it's hard to look at 2013 as anything other than the year of mirrorless cameras. Every camera manufacturer now has a mirrorless lineup, with options for casual shooters and professionals alike. After taking the entire field into account and putting more than 100 cameras through our rigorous lab tests, we've culled down the list to give you the best cameras of 2013.
Read our full review of the Olympus OM-D E-M1 here
The Panasonic GX7 wowed us with an improved design, superlative handling, and a great new EVF. Slightly smaller and cheaper than the E-M1, the GX7 still delivered excellent performance, proving that there's plenty of room for two stellar cameras in the Micro Four Thirds system. While we feel the E-M1's build quality, integrated phase-detect autofocus, and customizable control earns it the award here, the GX7 is also deserving of recognition. (MSRP $999.99 body-only. $1,099.99 w/ 14-42mm II lens)
Read our full review of the Panasonic GX7 here
Read our full review of the Sony QX10 here
Read our full review of the Sony RX1 here
While the RX1 represents a future where we may all carry full-frame cameras in our bags, the Fujifilm X100S is the perfect marriage of present and past. Styled after traditional rangefinders with digital filters simulating the look of classic film stocks, the X100S is a paean to retro camera lovers. In pure performance terms, the X100S improved dramatically on the X100—winner of this award last year—with faster autofocus and a superb hybrid viewfinder that follows in the footsteps of rangefinders past. (MSRP $1,299.99)
Read our full review of the Fujifilm X100S here
Read our full review of the Canon EOS-1D X here
While the 1D X may be our winner as the best camera for the working professional, in truth there is little that elevates it above the Nikon D4. The D4 offers roughly equivalent performance, with an excellent sensor, superb build quality, and some unique video features. We're especially impressed with the performance of the new XQD memory cards that the D4 can take advantage of, and we don't know why every pro DSLR doesn't come with backlit keys. The 1D X's superior autofocus is tough to ignore, but the D4 presents an excellent alternative for Nikon shooters. (MSRP $5,999.95)
Read our full review of the Nikon D4 here
Read our full review of the Nikon D600 here
The Canon 6D is by no means a bad camera—in fact, it's an excellent one—but it simply trails in the D600's wake here. The lack of a headphone jack is a puzzling omission from the so-called king of DSLR video and the inclusion of built-in WiFi simply doesn't make up for the loss of features elsewhere. Those invested in Canon's lens system will find the EOS 6D to be an excellent budget-friendly full-frame alternative, but as brand agnostics we have to hand it to the D600 here. (MSRP $1,899.00)
Read our full review of the Canon EOS 6D here
The Nikon D7100 goes toe-to-toe with the Canon EOS 70D and comes up just shy of the mark. The D7100's 24.3-megapixel APS-C sensor gives it a slight advantage in low light, its 51-point AF system is much more robust than the 70D's 19-point system, and the inclusion of a drive motor in the body gives it compatibility with dozens of legacy Nikon lenses. That said, the 70D's improved video quality and slick new autofocus capability gave it a slight edge over its rival, though both cameras are worthy additions to any kit. (MSRP $1,199.95)
Read our full review of the Nikon D7100 here
Read our full review of the Pentax K-50 here
One area where the Pentax K-50 does struggle is in video features—it doesn't even have an HDMI jack, something practically every point-and-shoot under the sun now has. The D5200 picks up the slack there with full manual control for video, a microphone jack, and, yes, an HDMI port. The D5200 backs that up with excellent video quality, as well as excellent all-around performance. Nikon has just refreshed this line with the D5300—adding WiFi, GPS, 1080/60p shooting, and a slightly larger screen—but the D5200 should be available as a steal as stocks dwindle. (MSRP $799.95)
Read our full review of the Nikon D5200 here
Read our full review of the Sony A58 here
Buying a DSLR means committing to a lens system, and for those looking at Nikon there's no more affordable option than the D3200. We don't feel the D3200 quite outdoes the A58, but it was an excellent performer in our labs and is an easy camera to learn and grow with. Its MSRP still stands at $699.95 with a kit lens, but the kit can be found almost everywhere at retail for $549.99. (MSRP $699.95)
Read our full review of the Nikon D3200 here
Read our full review of the Olympus OM-D E-M1 here
With last year's GH3, Panasonic proved that they could produce an excellent flagship Micro Four Thirds camera that could appeal to professionals. This year, the company is focusing on the design game, with its slick, compact GX7. The GX7 is an expertly crafted camera that manages to fit a hot shoe, EVF, tilting screen, and superb grip in a travel-friendly package. The GX7 may sit in the E-M1's shadow, but it's a spectacular camera and a worthy alternative for Micro Four Thirds shooters looking to save a few hundred dollars. (MSRP $999.99 body-only, $1,099.99 w/ 14-42mm II lens)
Read our full review of the Panasonic GX7 here
Read our full review of the Samsung NX300 here
The Panasonic GM1 is one of the most intriguing cameras to come through our labs in recent memory. Though it is just coming to market, the GM1 features an excellent Micro Four Thirds sensor, interchangeable lenses, and a body that is the same size as the so-called best point-and-shoot ever, the Sony RX100 II. Oh, and it costs the same as the RX100 II, with a $749.99 MSRP. While the NX300 narrowly beats it out, there's no better pound-for-pound option in this part of the market than the Panasonic GM1. (MSRP $749.99)
Read our full review of the Panasonic GM1 here
Read our first impressions review of the Sony NEX-5T here
Few associate Fujifilm's superb line of X-series cameras with the word "value." Fuji has built its name as a camera maker in the last two years by producing attractive, well-built bodies that appeal to more advanced shooters. With the X-A1, Fuji has produced a body that looks like the higher-end X-series cameras, but is built of much cheaper stuff. While we aren't fans of that particular trade-off, there's no cheaper way to get into Fuji's excellent X series. At $599.99 with a kit lens, the X-A1 is a bargain buy that's hard to ignore. (MSRP $599.99)
Read our full review of the Fujifilm X-A1 here
Read our full review of the Ricoh GR here
While the Ricoh GR outperforms it slightly, the Fujifilm X100S does have one major trump card: its hybrid optical/electronic viewfinder. It costs a pretty penny, but there's no better way to experience the classic feel of shooting with a rangefinder on a modern camera than with the X100S. Add to that the improvements Fuji made in autofocus speed, image quality, and general operation over the X100, and the X100S is hard to pass up. (MSRP $1,299.00)
Read our full review of the Fujifilm X100S here
Read our full review of the Sony RX100 II here
Death, taxes, and Canon's annual G-series update. Some things are truly dependable. Canon's G16 is the latest iteration of the company's long-running series, offering excellent video quality, improved low light performance, and plenty of manual control. The chintzy tunnel-vision viewfinder is firmly in the "better than nothing" category, but the G16 is still one of the best point-and-shoot cameras you can buy. (MSRP $549.99)
Read our full review of the Canon G16 here
Sony's HX50V doesn't quite offer the same level of performance as the higher-end point-and-shoots, but it does manage to fit a 30x optical zoom range into a compact body that easily fits in your jacket pocket. Of course, such a lens requires sacrifices, and Sony makes up the gap with a heavy dose of processing tricks. These aren't great, but if your shots primarily land on Facebook or in small prints, you'll hardly notice the difference, while still enjoying the expansive zoom range. (MSRP $449.99)
Read our full review of the Sony HX50V here
Read our full review of the Canon 330 HS here
The Canon 330 HS is the best performing sub-$200 camera we tested this year, but the Sony WX80 comes close. The WX80 has just a 7x optical zoom, but it has slightly better styling, is a little more compact, and also comes with Wi-Fi. The WX80's street price has dropped to $159.99, and it should also be very affordable throughout the holiday season. (MSRP $169.99)
Read our full review of the Sony WX80 here
Read our full review of the Canon SX50 HS
The Nikon P520 was the best superzoom we tested this calendar year, even though it lags behind the SX50 HS in overall performance. Side-by-side there's not much differentiating the P520 from the SX50 as both have a DSLR body style, comfortable grip, flip-out LCD screen, and included EVF. The P520's 42x optical zoom range doesn't quite measure up to the competition, but the overall performance is enough for us to give it the nod here. (MSRP $449.95)
Read our full review of the Nikon P520 here
Read our full review of the Sony HX50V here
Canon's PowerShot line of point-and-shoots aren't always the best in their respective category, but they're almost always well-designed, easy-to-use cameras. The SX280 is no exception, following up on last year's SX260 with a 20x optical zoom and a compact body that easily fits in a jacket pocket. At full zoom the image quality takes a big hit, but the the SX280 is otherwise a good all-around camera. (MSRP $279.99)
Read our full review of the Canon SX280 HS
The Canon S-series established a pretty clear blueprint for a great pocket camera, calling for a telescoping lens, 1/1.7-inch image sensor, and a control ring around front. While the original is still our pick, the Olympus XZ-10 has a lens that is better in low light, with more customizable control that advanced shooters will enjoy. The XZ-10 isn't quite as good as its big brother, the XZ-2, but it holds its own in a competitive category. (MSRP $399.00)
Read our first impressions review of the Olympus XZ-10 here
Read our full review of the Olympus TG-2
Even though the TG-2 retains its throne as the best waterproof camera of 2013, the Nikon AW110 is a perfectly good alternative. The AW110 is just as tough as the TG-2 in everyday use, offers similar image quality, and has a fantastic mapping interface (with points of interest) that is the best use of an in-camera GPS on the market. The TG-2 may take home top honors here, but we wouldn't fault anyone for opting for the Nikon based on personal preference. (MSRP $349.95)


 High-end DSLRs typically offer the best overall performance and control a photographer can ask for. But that level of functionality usually comes at a higher price. These cameras use mirrored through-the-lens viewing systems (though some offer Live View shooting through the LCD), and feature interchangeable lenses.


 This rapidly improving class of cameras includes both compact and "ultra-compact" systems that are primarily designed for quick and simple operation. Most of these cameras feature auto-focus-only lenses, various exposure options and a built-in flash.


 ILCs are small and highly capable cameras that feature a "mirrorless" viewing and rely on an electronic viewfinder and DSLR-sized sensors to capture and record images. These cameras are great for the more advanced photo enthusiast or pro looking for an always-available camera.


