Translate

Monday, March 17, 2014

Essay: What makes a good photograph.


Essay: What makes a good photograph.


How to Get Your Photography Into Galleries – PictureCorrect


How to Get Your Photography Into Galleries

Getting your photography into a gallery can be difficult without knowing how the entire process works. Experienced photographers Lois Youmans and Sandra Carrion share their insights and advice on how to get your work out there and seen by galleries in this helpful seminar:


Getting Recognition

To do well in photo competitions and increase your chances of getting seen by a gallery, you have to think ahead and consider what the judges and gallery curators are looking for.
  • Submit a cohesive gallery of images. Choose a theme and stick with it.
  • You don't need expensive equipment to take great photos, you have to have an eye.
  • Don't expect to be found, you have to make an effort to be seen.
  • Build a professional resume/curriculum vitae. Include an artists statement.
Among some of the other tidbits of advice, and the seminar is packed with helpful hints. The presenters instruct viewers on how to build a personal brand and utilize social media to build buzz around their artwork.
getting_into_galleries_1
One of the most important things discussed in the presentation is to keep in mind that a gallery will spend money to have an opening for your work. They will, or should be, spending money on advertising and promotions to get people to come see your work, so it's important to know what each specific gallery is looking for beforehand. Make the effort to learn about the galleries before you make an appointment to review your portfolio. No one likes their time to be wasted!

Thursday, March 13, 2014

Create Cinemagraphs on Windows | Photofocus


Create Cinemagraphs on Windows

cliplets
On Monday, we told you about a new program called Flixel for Mac which makes the cinema graph process very easy.  Over in the Photofocus forums, a reader (Bruce Goren) told me about a similar program from Windows.
fountain
Microsoft Research (a test group inside Microsoft) has been experimenting with what they call Cliplets.
Microsoft Research Cliplets is an interactive app that gives users the power to create "Cliplets" — a type of imagery that sits between stills and video, including imagery such as video textures and "cinemagraphs". The app provides a simple, yet expressive way to mix static and dynamic elements from a video clip.


You can try out the beta software for free (and this one is Windows only).
Candles4
______
This Post Sponsored by:
Photoshop World, the ultimate Photoshop, Photography & Lighting Conference. Atlanta GA, April 8-10.  Use the promo code PSWFOCUS414 to discount $50 OFF a full conference pass. Learn more in three days than you have in three years! 
ViewBug  Stick With ViewBug & Photofocus throughout 2014 – because we're announcing the biggest contest in Photofocus history — coming soon!
The HDR Learning Center Check out new ways to use High Dynamic Range photography to make compelling images. Free tutorials and posts to get results. Produced in partnership with HDRsoft.
Mosaic A complete solution for photographers using Lightroom who want to manage and share their photos. You can easily view images with their iOS app or web service. Plus your photos are backed up to the cloud with several plans to match your needs. Be sure to also check out the Lightroom Learning Center to learn new ways to work in Lightroom.
lynda.com Learn photography anytime, anywhere, and at your own pace—from bite-sized tutorials to comprehensive courses. Try lynda.com free for 10 days by visiting lynda.com/ Photofocus.
The Topaz Labs Image Enhancement bundle. Open up a world of creative possibilities with a seamless, integrated workflow. You don't need to be a Photoshop wizard to look like one. Click here and use the code photofocus to get a 15% discount.

Want to Make Cinemagraphs? Mac Users, Here’s a Limited Time Deal. | Photofocus


Want to Make Cinemagraphs? Mac Users, Here's a Limited Time Deal.

cmpbanner
I've been exploring cinemagraphs for sometime now… the technique of creating living photos with subtle movements.  I've got my own workflows mastered using Photoshop and After Effects, but I'm always curious when a new tool comes on the market.
Electric3
At WPPI, I saw a new product called Cinemagraph Pro from Flixel.  This makes the process incredibly easy. Essentially you import a video clip (up to 4K in resolution), and then paint to mask out the area where motion occurs.
electricUI
The product lists for $199… which I think is too high.  The company provides a reasonable justification that this is a pro tool aimed at a high-end niche market.  With that said, its on sale for $14.99, which is too cheap (but I'm not complaining).  This deal is Mac only and expires Thursday, March 13th (from my experience that means 12:01 am Thursday EST)… so if you want it, get it ASAP.


No, I don't know if it will ever come for Windows.  No I don't know if the price will change or when.  I do know the product is easy to use and works 98% the way I want it to out of the box. I also really like that the Flixel player works directly on the Twitter timeline.  If you're intrigued by motion, have $15 and a Mac… pick it up now.
______
This Post Sponsored by:
Photoshop World, the ultimate Photoshop, Photography & Lighting Conference. Atlanta GA, April 8-10.  Use the promo code PSWFOCUS414 to discount $50 OFF a full conference pass. Learn more in three days than you have in three years! 
ViewBug  Stick With ViewBug & Photofocus throughout 2014 – because we're announcing the biggest contest in Photofocus history — coming soon!
The HDR Learning Center Check out new ways to use High Dynamic Range photography to make compelling images. Free tutorials and posts to get results. Produced in partnership with HDRsoft.
Mosaic A complete solution for photographers using Lightroom who want to manage and share their photos. You can easily view images with their iOS app or web service. Plus your photos are backed up to the cloud with several plans to match your needs. Be sure to also check out the Lightroom Learning Center to learn new ways to work in Lightroom.
lynda.com Learn photography anytime, anywhere, and at your own pace—from bite-sized tutorials to comprehensive courses. Try lynda.com free for 10 days by visiting lynda.com/ Photofocus.
The Topaz Labs Image Enhancement bundle. Open up a world of creative possibilities with a seamless, integrated workflow. You don't need to be a Photoshop wizard to look like one. Click here and use the code photofocus to get a 15% discount.

Understand Exposure in Under 10 Minutes


Understand Exposure in Under 10 Minutes

A Post By: Annie Tao

DPS-Annie-Tao-Exposure-article-perfect-exposure-exampleThere are countless Photography books and classes that explain exposure, yet after reading or attending them, your photos may not have improved because…well, let's be honest… some of us Right-Brainers aren't super technical!

I recently taught a small photography class to newbies. I thought hard about how I could explain exposure in the simplest way possible. I found that a parallel example of something relatable was the best way to convey the different aspects that impact exposure.

I tested this theory by explaining exposure to my 8-year old daughter and then quizzed her. She proved the theory was a success by grasping the concepts within 10 minutes. So I'd like to share my lesson with you so you can understand exposure in under 10 minutes!

A 10-minute lesson that will change your Photography

Your DSLR camera is like your head with the LENS being your vision and the camera BODY is your brain. Your vision sees things and your brain records the details.

DPS-Annie-Tao-Exposure-article-camera-metaphor

Just like when you look at something – let's say, a flower – your eyes see it and send information to your brain that the flower has long petals and that it is yellow. If you looked at it too quickly or it was too dark, for example, the information your brain records is compromised.

The "exposure triangle" is about how 3 things — aperture, shutter speed and ISO — work together to provide enough light for your brain (the camera) to record what you see. You need the right combination of these 3 components to have perfect exposure.

DPS-Annie-Tao-Exposure-article-perfect-exposure-example

Good exposure

For example, if you don't let in enough light, you won't see things very well because it'll be too dark (underexposure).

DPS-Annie-Tao-Exposure-article-underexposure-example

Too dark, or underexposed

If you let in too much light, then it'll be too bright and you can't see a lot of the details (overexposure).

DPS-Annie-Tao-Exposure-article-overexposure-example

Too bright, or underexposed

APERTURE = how WIDE you open your eyes

A small aperture (a large f-stop or f-number, like f/22) is like squinting. A large aperture (a small f-stop or f-number, like f/1.4) is like having "bug eyes".

Quiz:  If you are shooting in low light, how wide do you open your eyes? Will you see well at night if you are squinting (small aperture)?

Quiz:  What happens on a super bright day if your eyes are wide open and they're open for a long time (slow shutter and large aperture)? Can you see well then?

DPS-Annie-Tao-Exposure-article-fish-with-eyes-open-wide-and-squinting

Aperture is how big you open your eyes – bug eyes, or squinting

SHUTTER SPEED = how LONG you open your eyes

A fast shutter, like 1/1000th of a second, is blinking super fast. A slow shutter speed, like 2 seconds, is keeping your eyes open and then blinking. The thing to remember is:  your brain is recording everything when your eyes are open. So if you or something you're looking at is moving, and your eyes are open a long time (slow shutter), then your brain will record a blurry image.

Quiz:  If you want a crisp shot of someone jumping, how long do you need your eyes open? What will freeze the shot:  a quick blink (fast shutter) or a slow one (slow shutter)?

DPS-Annie-Tao-Exposure-article-moonglasses

ISO special glasses

ISO = special glasses that help you see in the dark

ISO is like the opposite of sunglasses. Let's call them MOONglasses!  ;)

The higher the ISO, the thicker your moonglasses, so the more you are able to see in low light. You need thick moonglasses (high ISO) when shooting indoors or at dusk. You need very thin moonglasses (low ISO) when it's a sunny day.

Quiz:  do I need thick, thin or medium moonglasses if I'm shooting at the beach on my lunch break?

All 3 of these things work together

Here is an example:  You are photographing your sleeping cat who is snuggled on the couch. There is not much light coming through the windows or additional ambient light. To see well, you have medium-to-thick moonglasses on (such as ISO 600). You need to have your eyes open pretty wide (large aperture, such as f/1.4). However, you don't have great vision (you have a kit lens that only goes up to f/4.5), so you need more light to see. Thus, you leave your eyes open longer (slow shutter speed, such as 1/30th sec).

Final Quiz:

  1. In the same scenario, your cat notices you are snapping photos, so she starts walking away and leaps off the couch. You still want to photograph her. Which would you change:  how open your eyes are (aperture), how long you leave your eyes open (shutter speed), or thickness of your moonglasses (ISO)?
  2. If you increase your shutter speed because you want to freeze the image, what else would you need to change? (If you changed nothing else, the image would be too dark because you let in less light.)

Once you get the basic concept of exposure and how the three components of the exposure triangle (aperture, shutter speed and ISO) work together, turn your DSLR camera to "manual" and practice the specific settings based on different circumstances.

Want more on exposure?  Try these:


Monday, March 10, 2014

6 Photography Lessons From a Combat Sniper - DIY Photography


6 PHOTOGRAPHY LESSONS FROM A COMBAT SNIPER

6 Photography Lessons From a Combat Sniper
We see them in movies, we watch History Channel specials about them, and they are the things of which legends are made. Surprisingly, no, I'm not referring to UFOs. We're talking about combat snipers, those lethal ghosts in face paint shifting in the shadows.
I began contemplating the possible parallels between photographers and these men of mystery, and, as I have rarely ever fallen into a category that the military deems as useful for more than civilian life, I sat down one evening with a friend and former U.S. Army sniper to get the lowdown on what life as a precision shooter is really like. As we sat around a crackling campfire beneath a mesh camo canopy, I was intrigued and somewhat surprised as Andy (because heroes literally care that little about protecting their identity) recounted stories of combat missions in the mountains of Afghanistan. But, as we continued to talk, I began to see more and more the applicable parallels between these elusive soldiers and those of us in the metaphorical "trenches" of photography. (There's really no comparison, I know…)

1. Know Your Equipment and Your Skills

This is paramount to being effective in your role — fully understanding the capabilities and limitations of your gear and knowing how your skills align with that. Having the most advanced camera system in the world does you nothing if you are not competent in using it. I have seen images from photographers who spent thousands on equipment that do not compare to those of an adept photographer with a glorified point-and-shoot. And, likewise, there are limitations to your effectiveness if the job requirements extend beyond the facility of your gear. I mean, let's be real…you aren't going to shoot high-speed "bullet time" images with a single Kodak Easyshare.
NOTE: If you can, we want to know about it! Strap the details to the back of a pigeon, and set it free!…if it comes back to you, it was probably hungry.
You need to be aware of the environmental limitations of your equipment as well. If there wasn't a moon or at least stars shining in the mountains of Afghanistan, night vision optics were of no use and soldiers had to blindly feel their way along the rugged terrain. Sometimes, no amount of trying and finagling or DIY-ing will allow you to do what you want (although we still try our darndest, regardless). It's okay…it happens… Just move on and adapt.
sniper-photography-01

2. Observation Is As Important As Engagement

Contrary to the illusion many have from Hollywood of a sniper's role, much of the time spent in the field is comprised of reconnaissance. So often we think of photography as being all about capturing the subject or documenting the moment, but, more often than not, we need to take the time to just observe what's in front of us. Situational awareness is vital to not only understanding what we're seeing but also calculating our plan of attack. Simply rushing in and opening fire like Rambo is not an effective method for exacting the results we want.
sniper-photography-02

3. It's a Waiting Game

While most people would be jumping at the opportunity to join the elite ranks of sniperhood, Andy recounted how one of the snipers in his unit simply…quit…because it was so damn boring. In the same vein as calculated observation, photography is often a waiting game…exercising patience, as hard as it may be sometimes, lying in wait for that one, specific shot. Perhaps it's waiting for the subject to come into frame to compose that once-in-a-lifetime image, or maybe it's enduring while a scene unfolds in front of you to present the perfect opportunity or the sun to hit those trees at that specific angle. Whatever the case may be, patience is a virtue which few possess but one that will ultimately pay off.
sniper-photography-06

4. Remain Calm and Focused

I am often guilty of becoming trigger-happy when unleashed on a photographic opportunity, whether it's an in-studio client, a documentary subject, or my own kids running around the yard. I tend to go nuts sometimes, filling up half a memory card (more or less) without ever bagging anything really good. We photographers want to capture EVERYTHING, not missing a single opportunity, and while there are situations that absolutely call for "spraying-and-praying," most of the time if we paused to take a breath and collect our thoughts, we would be able to capture a much more dynamic work. True photography is about quality, NOT quantity. Just imagine if Ansel Adams had tried to burn through slides as quickly as possible…do you really believe we would have the awe-inspiring, iconic images now synonymous with his name?
sniper-photography-03

5. Choose the Right Gear For the Situation

When heading into enemy territory, there were many things to take into consideration. Do you take a backup weapon in the event you find yourself in a firefight? Do you grab a SAW with a higher rate of fire but less reliability, or do you take an M4 with less capacity but fewer chances of error? There will be no resupply during the mission, so how much food and water do you lug around with you? How much will be consumed along the way?
Photographers are often faced with a similar dilemma: Do you weigh yourself down with a full-frame body and an array of lenses, or do you opt for a smaller body and single prime lens? Will you be moving around a lot, or does the situation call for a more stationary position? Street photographers, for instance, are notorious for keeping it simple, sticking with a typically-small body and prime lens, while a wedding may require a double-camera harness and zoom lenses, and a commercial shoot might require an entire set with medium-format cameras, lighting and assistants. Each scenario is different and should be treated individually. Make the best choice of gear to provide ample flexibility without incurring unnecessary encumberment.
sniper-photography-05

6. Practice Builds Skill and Confidence

There's no way around it: repetition builds perfection. A sniper spends countless hours at the practice range and on simulated missions to not only increase proficiency but to familiarize the soldier with their true capabilities and potential. There's a difference between hoping you can make that headshot at 800 meters and knowing that you can, and that knowledge only comes through repeated successful execution of the drill. And, the practice does not simply end when you graduate from sniper school!
If we photographers took all the time and energy that we put into theory and talk and, instead, channeled it into hands-on application, is there really any limit to what we could create? Get out there and shoot! Give yourself challenges; set regular goals to keep yourself in regular practice. Because, if you're not advancing, you're regressing.
Looking for a place to start? Check out 25 Ways to Jump Start Photography Inspiration!
sniper-photography-07
You are a well-trained, precision executor of visual art. (Hoorah!) There is no need to be otherwise. It's not the biggest, the baddest, or the toughest who make it through sniper school; it's those with determination, focus, and a sense of purpose who make it into the ranks of the elite.
(And you don't even have a CO yelling at you to carry 150 lbs. of gear on a 30-mile march!)
*Photos courtesy of Andy Plank

Thursday, March 6, 2014

How to Take Stunning Beach Photos – PictureCorrect

How to Take Stunning Beach Photos – PictureCorrect


Think Tank Photo new product releases

Our friends at Think Tank just announced the release of new products aimed at enhancing your workflow and increased mobility.
 
Think Tank Photo's new Modular Pixel Pocket Rocket (PPR) is belt-mountable, which enables you to easily whip out CF and SD cards and to keep them securely and conveniently at hand when shooting. The Modular PPR is easily secured by a sturdy hook-and-loop panel to any Think Tank Photo modular belt or to any belt.  It holds six CF cards and three SD cards, as well as other small accessories, such as a smart phone or lens cloth.
 
The App House 8 and the App House 10 are two hybrid bags for quick access to a small or standard-size Apple tablets and can be used either as shoulder bags or mounted on belts. Streamlined and secure, their small size, removable shoulder strap, and double-lock belt-mount make it practically effortless for you to carry and access your tablet and stay connected around town or when traveling.  Key features include: Dedicated pockets for carrying a smart phone, device accessories, plus other small items; a dedicated, easily accessible smart phone pocket with soft liner; and an internal organizer with elastic and zippered pockets for connection cables, card readers, power cables, portable charger, pens, or other personal items.

http://bit.ly/1ouA34Z

New PIXEL Pocket from our partners at THINK TANK PHOTO!


http://bit.ly/1mZqv6B


How (and Why) to Use Back Button Auto-Focus – Video

From: Karen Newman <dusting4u@aol.com>

How (and Why) to Use Back Button Auto-Focus – Video

Link to PictureCorrect Photography Tips

Posted: 27 Feb 2014 05:14 PM PST
Most photographers auto-focus the traditional way: press the shutter down halfway, then compose your shot and pray your subject doesn't move around. Or press down halfway and quickly take the photo in the same second. This video is demonstrating a different method–one that claims to make auto-focus much easier to manage:

The Three Auto-Focus Settings

Your camera should have three AF modes. (Note that the photographer in this video is working with a Nikon camera; Canons and Sonys use slightly different terminology, but the gists of each are the same.) The three modes are as follows:
  • AF Single Shot. Good for stationary shots, in this mode you press the shutter halfway down and it locks a certain depth of field in focus.
  • AF Continuous. The AF will follow a moving subject after you've targeted your subject with the AF icon in your viewfinder.
  • AF Auto. Ideally, this mode switches automatically from single to continuous, but it isn't always accurate.
An example of why AF Single Shot sometimes doesn't work.
An example of why AF Single Shot doesn't always work: if your subject moves, you're screwed.

How Back-Button Auto-Focus Works

Steve Perry of Backcountry Gallery recommends using back-button AF. Again, the term "back-button AF" only applies to certain Nikons, like the Nikon D800, which offers a literal button on the back of the camera that says "AF-On". (Any camera can designate a back-button to AF, though; theNikon D5100 has AE/AF Lock; Canons use their asterisk button.)
You have to activate the system first, though, by setting your camera on AF Continuous, then going into the "custom settings" menu, finding "AF Activation" and selecting "AF-On only".
Now you'll focus differently: when you want to focus a shot, hold the AF-On button rather than the shutter (which now only takes a photo), and release the button to lock your subject in focus. You can then freely compose your shot and your subject will stay in focus. If it's moving, you can simply hold the AF-On button down and follow it, the same way AF Continuous works.
canon-slr-back-button
Some Nikon cameras have the AF-on button, making this process much easier.

Advantages of Back Button Focus

Perry lists off three reasons why this AF method is better than the conventional one.
  1. You have more accurate control. Your camera won't re-focus between shots, the way the shutter necessitates; instead it will keep the same depth of field locked in so you can take multiple shots without worrying about finicky focus.
  2. It's good for action shots. If your subject is moving, you can follow it by holding the button down to enable AF Continuous mode. Because you're not switching back and forth between Single Shot and Continuous, you can spend less time dealing with mechanics and more time shooting.
  3. It also works for landscape shots. Because the shutter AF isn't always accurate, focusing on either the foreground or center, but not necessarily the one you want, and then refocusing every time you release the shutter. This method allows you to lock in what's in focus, then focus your own attention on composition.
focus-tutorial
Perry ends the video by warning that most people will find this system counter-intuitive, maybe even mess up a few good shots. He recommends sticking with it for a few weeks to realize its advantages, and testing it out on less important shots to get the hang of it. Anyone who's converted can tell you: they'll never go back.

Go to full article: How (and Why) to Use Back Button Auto-Focus – Video 

What are your thoughts on this article? Join the discussion on Facebook or Google+ 

Article from: PictureCorrect Photography Tips 

  
Posted: 27 Feb 2014 03:03 PM PST
With the ominous-sounding "polar vortex" of cold weather that has been winding its way across much of the US, things are freezing up that normally don't, creating phenomenon like walkable lakes and ice caves. In fact, a recent satellite photo from NASA of the Great Lakes region shows three of the five lakes almost completely frozen over — the first time this has happened in 20 years:
frozen great lakes
The Great Lakes frozen over. (Via Imgur. Click to see larger size.)
The last time the lakes reached around 90 percent ice coverage was in 1994.

Go to full article: Interesting Photo of the Day: The Great (Frozen) Lakes 

What are your thoughts on this article? Join the discussion on Facebook or Google+ 

Article from: PictureCorrect Photography Tips 

  
Posted: 27 Feb 2014 02:51 PM PST
For the do-it-yourselfers out there, Tyson Waggener has created a video tutorial to outline the process of making your own 4-in-1 light reflector–for under $20–using items that can easily be found in most hardware stores. The procedure is simple and can be completed in a less than hour:

Materials Needed

  • 2 pieces of white foamcore
  • a can of gold metallic spray paint
  • a can of silver metallic spray paint
  • a can of flat black spray paint
  • a roll of black duct tape
As Waggener explains in an update to the video, it is possible to purchase this style of reflector at about the same price as it would cost to purchase the items you'd need to follow the tutorial; however, at the time he made the video, that wasn't the case.
diy_reflector_1
Waggener kept the tutorial up for those who simply enjoy crafting things, who want to make a custom reflector, or who may happen to have the necessary materials lying around the house.

Go to full article: How to Make a DIY Reflector Board (Video) 

What are your thoughts on this article? Join the discussion on Facebook or Google+ 

Article from: PictureCorrect Photography Tips 

  
Posted: 27 Feb 2014 01:21 PM PST
In some ways, she's the ideal fashion model: she doesn't blink, she takes direction, she doesn't have an ego. How could she? She's plastic. (It's fantastic!) The men behind the latest Sports Illustrated Swimsuit edition went all-out with this recent parody photo shoot. Watch the brisk two-minute satire here:
The shoot was helmed by iconic sports photographer Walter Iooss, best known for emotional portraits of Kobe Bryant, Bill Clinton, Lebron James, Morgan Freeman, and now Barbie. "She gets it," Iooss says in the video of the popular girly doll, without a trace of irony. "And the great models get it."
There really isn't more to be said about this one. The video's short; we recommend you check it out.
barbie-photo-shoot
Is Barbie the ideal model?
"I've been waiting for this day with Barbie. I've seen all the good ones go through the locations, but she's hot. Barbie's hot."- Walter Iooss

Go to full article: Behind the Scenes of a Model Shoot, Starring… Barbie? 

What are your thoughts on this article? Join the discussion on Facebook or Google+ 

Article from: PictureCorrect Photography Tips 


Wednesday, March 5, 2014

The world's largest photo service just made its pictures free to use | The Verge


The world's largest photo service just made its pictures free to use

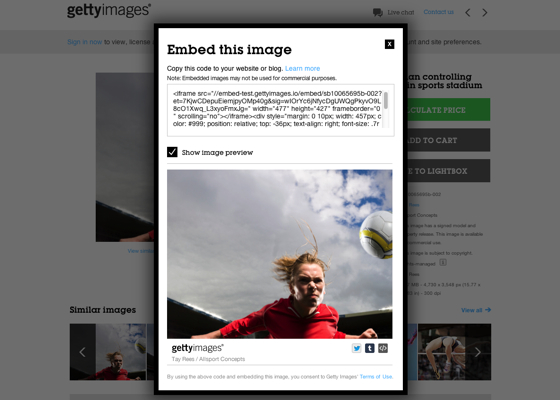
If you go to the Getty Images website, you'll see millions of images, all watermarked. There are more than a hundred years of photography here, from FDR on the campaign trail to last Sunday's Oscars, all stamped with the same transparent square placard reminding you that you don't own the rights. If you want Getty to take off the watermark, you'll have to pay for it.

"Our content was everywhere already."

Starting now, that's going to change. Getty Images is dropping the watermark for the bulk of its collection, in exchange for an open-embed program that will let users drop in any image they want, as long as the service gets to append a footer at the bottom of the picture with a credit and link to the licensing page. For a small-scale Wordpress blog with no photo budget, this looks an awful lot like free stock imagery.

It's a real risk for the company, since it's easy to screenshot the new versions if you want to snag an unlicensed version. But according to Craig Peters, a business development exec at Getty Images, that ship sailed long ago. "Look, if you want to get a Getty image today, you can find it without a watermark very simply," he says. "The way you do that is you go to one of our customer sites and you right-click. Or you go to Google Image search or Bing Image Search and you get it there. And that's what's happening… Our content was everywhere already."

Gettyembed

The new embeds strike directly at social sharing

Looking at the pictures on Twitter, it's hard to disagree. Wildly popular accounts like @historyinpics can amass hundreds of thousands of followers with nothing but uncredited, unlicensed images, and since there's no direct revenue, there's little point in asking them to pay. At that scale, anything more expensive than free is a prohibitive cost. The new embeds strike directly at that kind of social sharing, with native code for sharing in Twitter, Tumblr, and Pinterest alongside the traditional Wordpress-friendly embed code. Peters' bet is that if web publishers have a legal, free path to use the images, they'll take it, opening up a new revenue stream for Getty and photographers.

The new money comes because, once the images are embedded, Getty has much more control over the images. The new embeds are built on the same iframe code that lets you embed a tweet or a YouTube video, which means the company can use embeds to plant ads or collect user information. "We've certainly thought about it, whether it's data or it's advertising," Peters says, even if those features aren't part of the initial rollout.

The digital shift has been hard on photographers

The clear comparison is the music industry, which was hit hard by piracy in the '90s and took decades to respond. "Before there was iTunes, before there was Spotify, people were put in that situation where they were basically forced to do the wrong thing, sharing files," Peters says. Now, if an aspiring producer wants to leak a song to the web but keep control of it, they can drop it on Soundcloud. Any blog can embed the player, and the artist can disable it whenever they want. And as Google has proved with YouTube, it's easy to drop ads or "buy here" links into that embed. "We've seen what YouTube's done with monetizing their embed capabilities," Peters says. "I don't know if that's going to be appropriate for us or not." But as long as the images are being taken as embeds rather than free-floating files, the company will have options.

Embeds have enabled a new kind of link rot

Getty Images' profits haven't cratered like music conglomerates: its profits actually increased nearly $100 million from 2007 to 2011, thanks in part to digital licensing. Still, the digital shift has been hard on photographers, with professional stipends increasingly replaced by smaller payments to amateur or freelance photographers. Part of Peters' promise is that the new embeds will open up larger flows of money down the road.

The biggest effect might be on the nature of the web itself. Embeds from Twitter and YouTube are already a crucial part of the modern web, but they've also enabled a more advanced kind of link rot, as deleted tweets and videos leave holes in old blog posts. If the new embeds take off, becoming a standard for low-rent Wordpress blogs, they'll extend that webby decay to the images themselves. On an embed-powered web, a change in contracts could leave millions of posts with no lead image, or completely erase a post like this one.

Still, such long-term effects are years away, if they happen at all. In the meantime, Getty Images is focused on the more immediate problem of infringement. "The principle is to turn what's infringing use with good intentions, turning that into something that's valid licensed use with some benefits going back to the photographer," says Peters, "and that starts really with attribution and a link back."